
Basement Projects: What Most Homeowners Get Wrong About Moisture, Insulation and Materials That Actually Last
A finished basement can turn a dim storage area into a guest suite, home office or family hangout. It’s also a project that can easily run past its budget and timeline.
The culprit usually isn’t the drywall or the paint. Overruns often trace back to three things homeowners underestimate — moisture, hidden structural problems and the sheer volume of debris that comes out before anything new goes in.
Knowing what to look for before you start helps you set a realistic budget, avoid redoing work and choose materials that hold up for years. Here’s where basement finishing projects tend to go wrong and how you can plan around each issue.
Budget Overruns That Start at the Planning Stage
You’ll likely build your basement budget around the visible parts of the project. Those are the framing, drywall, flooring, lighting and paint. Square footage, layout and finish level all shape what finishing a basement costs, and those numbers are easy to price out ahead of time.
The trouble is that basements hide a lot. Concrete walls, slab floors and old finishes can cover up water damage, cracks and outdated materials that only show up once work begins. Each surprise adds cost and pauses the schedule while you decide how to handle it.
A smarter approach is to treat the first phase as an investigation. Inspect the space closely, test for moisture and plan for demolition before you commit to a final design. Then build a contingency fund into your budget so a surprise doesn’t stall the whole project. Older homes usually deserve a bigger cushion since they’ve had more time to develop hidden problems.
Moisture Problems That Hide in Basement Walls
Moisture can shorten a finished basement’s lifespan. Your basement sits below ground, surrounded by soil that holds water after every rainstorm and snowmelt. Concrete is porous, so water and water vapor can move through walls and floors even when you never see a puddle. It’s a widespread problem, too. In 2023, 11.8 million U.S. homes reported water leaking in from outside.
If you frame and drywall over a damp foundation, that moisture gets trapped. The result can be mold, rotting studs, warped flooring and a musty smell that never quite goes away. Fixing it later usually means tearing out the finished work and starting over.
Warning Signs That Point to Water Trouble
Before you buy a single stud, spend some time looking for clues that water is getting in. Start with these checks:
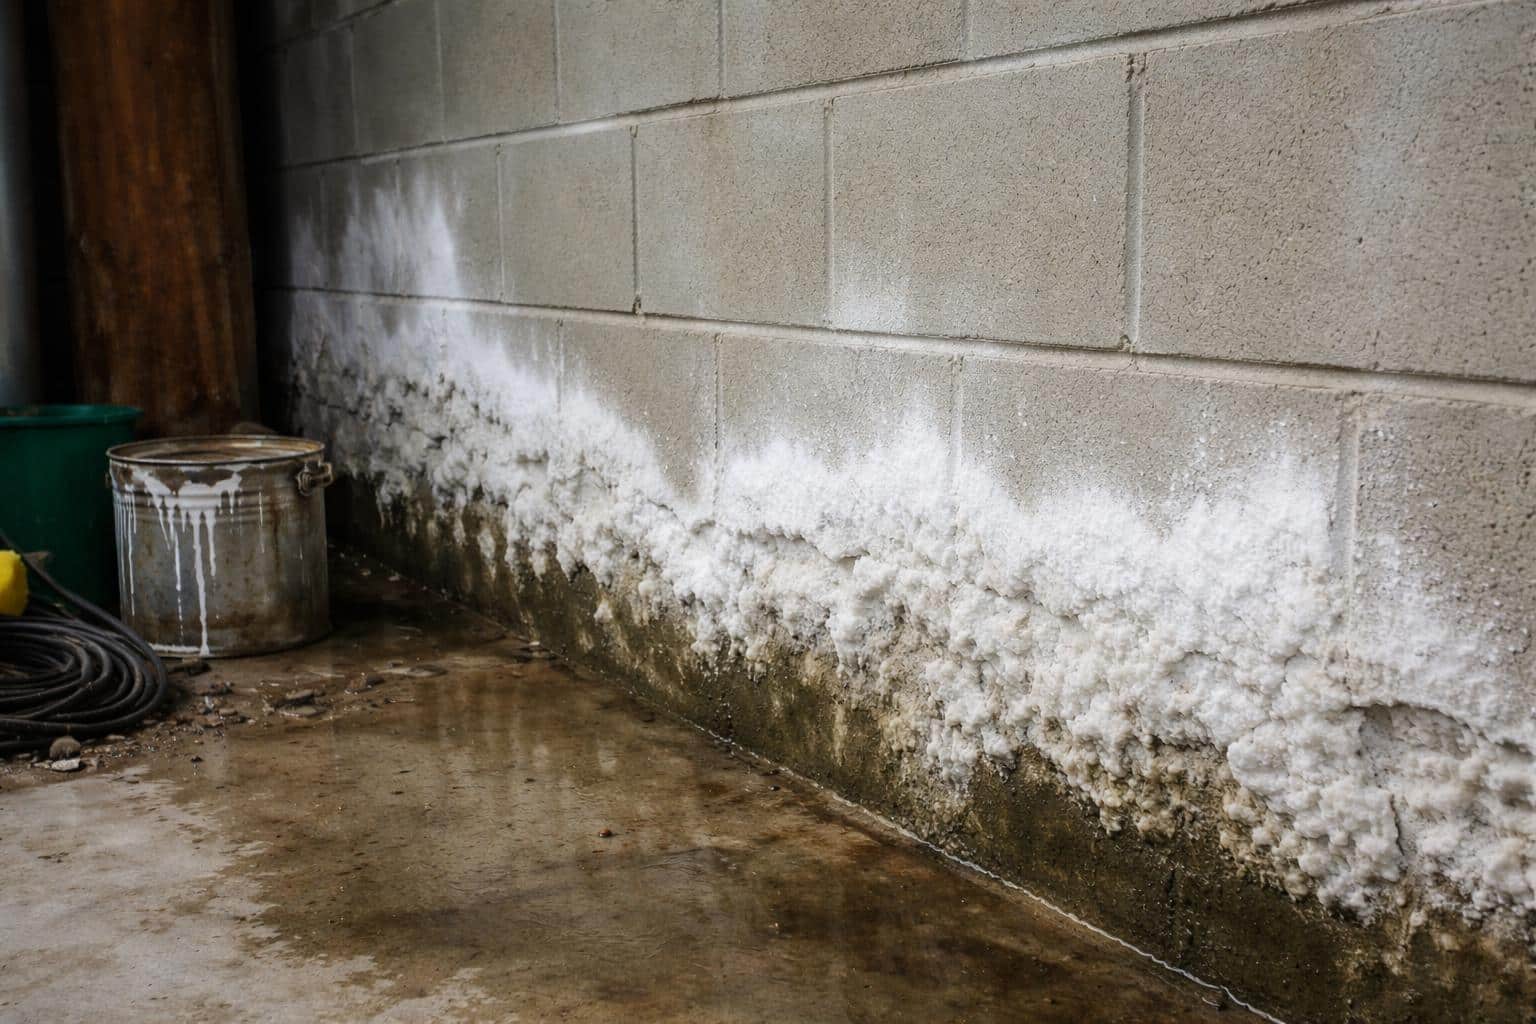
- Check for white, chalky deposits: This residue, called efflorescence, forms when water carries minerals through concrete and evaporates.
- Notice any musty odors: A persistent smell often means hidden dampness or mold.
- Look for stains and tide lines: Discolored patches on walls or floors indicate where water has previously collected.
- Inspect existing finishes: Paint that bubbles or peels and carpet that feels damp are both red flags.
- Watch for sweating pipes and walls: Condensation in summer indicates high humidity that needs to be managed.
A simple test can tell you more. Tape a 2-foot square of plastic sheeting tightly to the wall or floor and leave it for a few days. Moisture on the underside of the plastic means water vapor is moving through the concrete. Moisture on top of the plastic indicates the air in the room is too humid. Once you know the source, fix it before you build. Common solutions include:
- Regrading soil so it slopes away from the foundation.
- Extending downspouts to carry roof runoff away from the house.
- Sealing cracks in walls and floors.
- Adding interior drainage or a sump pump.
- Running a dehumidifier to control indoor humidity.
These steps add cost up front, but they protect everything you install afterward.
Flooring That Stands Up to Moisture
Your flooring choice is the next line of defense. Carpet and solid hardwood both absorb moisture, which makes them risky over a concrete slab.
Luxury vinyl plank (LVP) is a much safer bet. It shows up in so many bathroom renovations and remodels because it is waterproof, cleans up easily and needs very little upkeep. Those same traits make it a strong fit for basement finishing projects.
Most LVP installs as a floating floor, so it can handle minor slab movement and is simple to replace one plank at a time. It also mimics the look of wood or stone, so you don’t have to sacrifice style for durability. For extra protection, pair it with an underlayment that includes a built-in vapor barrier.
Insulation Mistakes That Trap Moisture
Insulation makes a basement comfortable year-round, but the wrong approach can create the very moisture problem you just solved. It’s tempting to insulate a basement the same way you would an upstairs wall. That habit causes trouble below grade.
A common mistake is pressing fiberglass batts against a concrete wall and covering them with plastic sheeting. Fiberglass soaks up moisture and stays damp. The plastic then traps that moisture between the wall and the insulation, creating the perfect spot for mold to grow out of sight. Since moisture control is key to preventing mold, your insulation plan should help keep the wall dry.
These choices work much better in a basement:
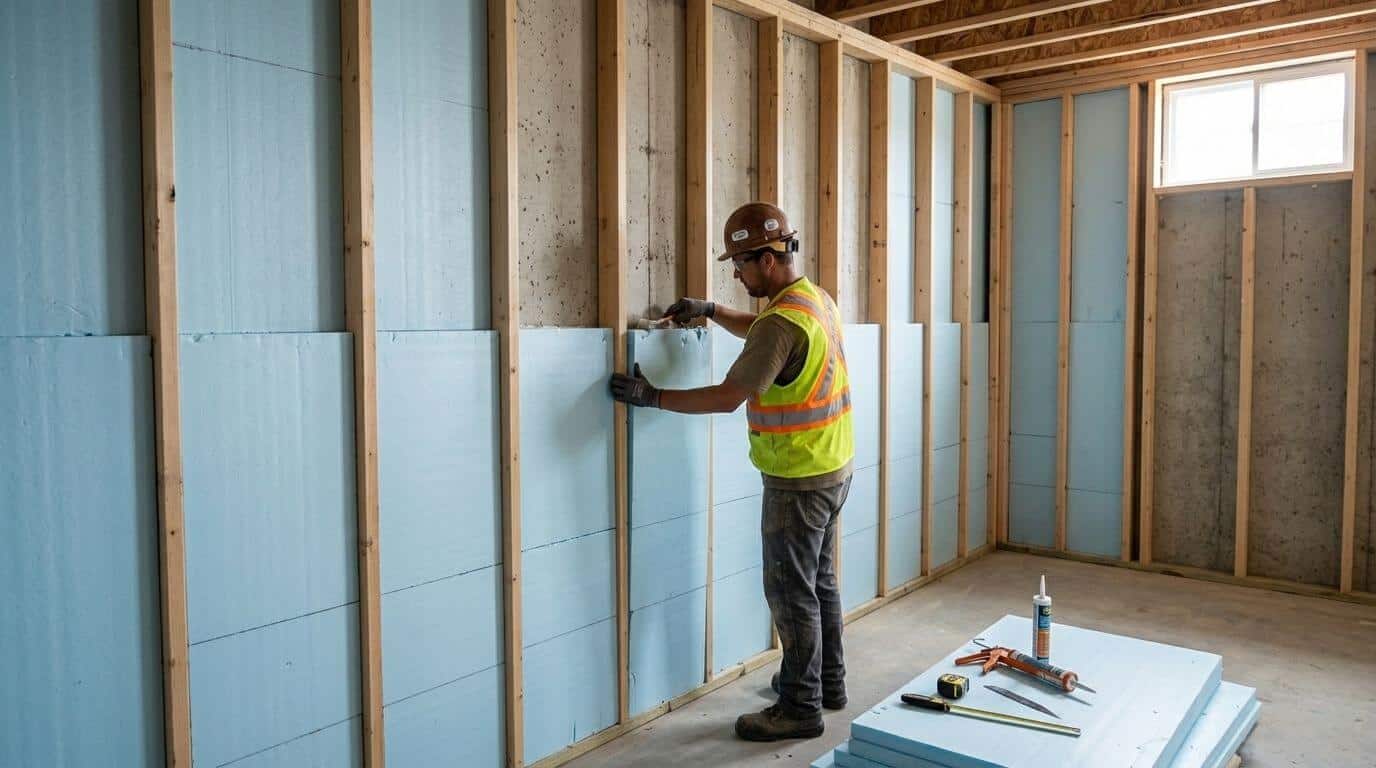
- Use rigid foam board: Foam panels set directly against the concrete resist moisture and add insulation without trapping water in a cavity.
- Consider closed-cell spray foam: It seals air gaps and insulates in one step, though it costs more and usually requires a professional.
- Leave a small gap behind the framing: Space between your stud wall and the foundation keeps wood from touching damp concrete.
- Choose pressure-treated bottom plates: Treated lumber holds up far better where the wall meets the slab.
Remember to insulate the rim joists, the band of framing that sits on top of the foundation wall. They’re a major source of drafts and condensation, and foam works well there, too. Local building codes set specific insulation and fire-safety requirements, so check yours before you buy materials.
Structural Issues That Demolition Reveals
Some of the most expensive surprises stay hidden until the old paneling or drop ceiling comes down. Once you open things up, you get your first real look at the bones of your home.
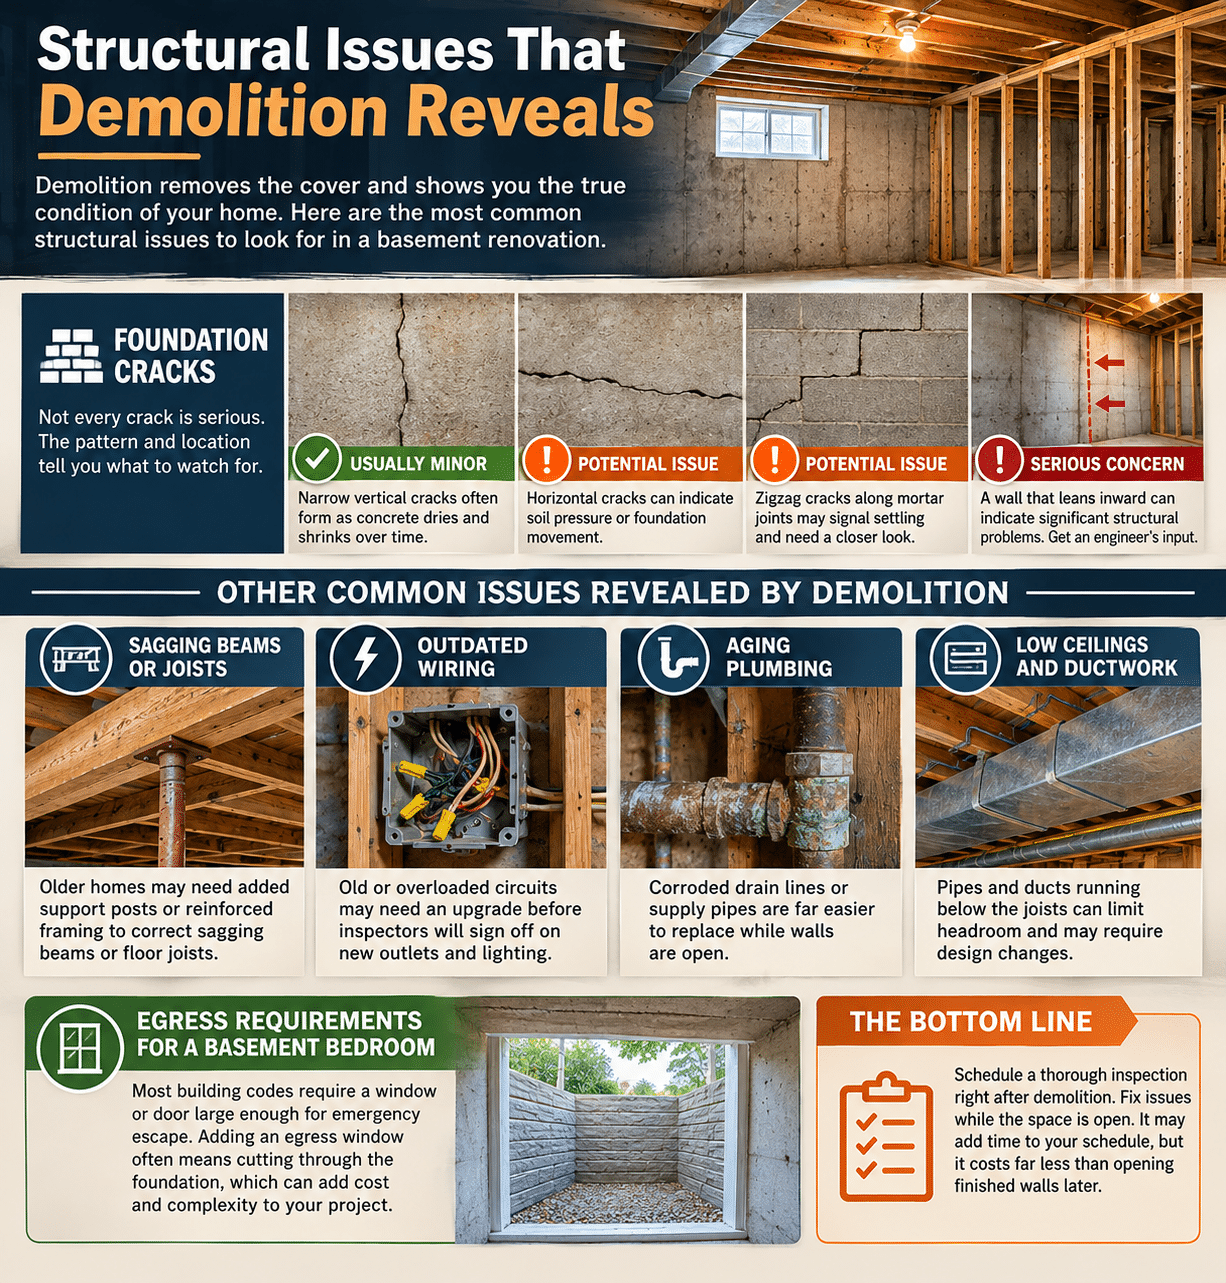
Foundation cracks are the most common discovery. Not every crack is cause for alarm. Narrow vertical lines often form as concrete dries and shrinks over time. Cracks that run sideways, zigzag along mortar joints or appear alongside a wall leaning inward deserve a closer look. They can point to soil pressure or settling that needs a structural engineer’s input before you cover anything up.
Demolition can also reveal problems beyond the foundation, such as:
- Sagging beams or joists: Older homes may need added support posts or reinforced framing.
- Outdated wiring: Old or overloaded circuits may need an upgrade before inspectors will sign off on new outlets and lighting.
- Aging plumbing: Corroded drain lines or supply pipes are far easier to replace while walls are open.
- Low ceilings and ductwork: Pipes and ducts running below the joists can limit headroom and force design changes.
If you plan to add a bedroom, you’ll also need to think about egress. Most codes require a window or door large enough for emergency escape, and adding one often means cutting through the foundation.
The smart move is to schedule a thorough inspection right after demolition. Fix what you find while the space is wide open. This step may add time to your schedule, but it costs far less than opening finished walls later.
Demolition Debris That Piles Up Quickly
It’s easy to underestimate how much time and space the mess will take up. Even a modest basement can produce a surprising amount of waste once you strip it down to the concrete.
Debris tends to arrive in waves throughout the project — old furniture, boxes and stored junk need to go before work starts. Paneling, drywall, carpet and padding, ceiling tiles and old framing come out next. Waterproofing, drainage work or a new egress window can generate large amounts of concrete and soil. Lumber cutoffs, drywall scraps, insulation trimmings and packaging pile up as you build.
All of that material has to leave the house, and it usually travels up a narrow staircase. Curbside pickup won’t take most of it, since residential trash services often cap how much they’ll haul away. Hauling loads to the landfill yourself eats up weekends and slows every other phase of the project.
Renting a roll-off dumpster for the duration of the project keeps the workspace clear and safer to move around. Choose a size slightly larger than you think you need, since ordering a second container usually costs more. Ask what’s allowed before you load it, too. Paint, chemicals and other hazardous materials typically need separate disposal.
Older homes call for one extra step since flooring, pipe wrap and paint may contain asbestos or lead. Have suspect materials tested before demolition begins.
Materials That Last in a Finished Basement
Even a dry basement stays cooler and more humid than the rest of your home. Choosing materials built for those conditions helps your finished space look good for years, not just a few seasons.
Here’s where it pays to upgrade:
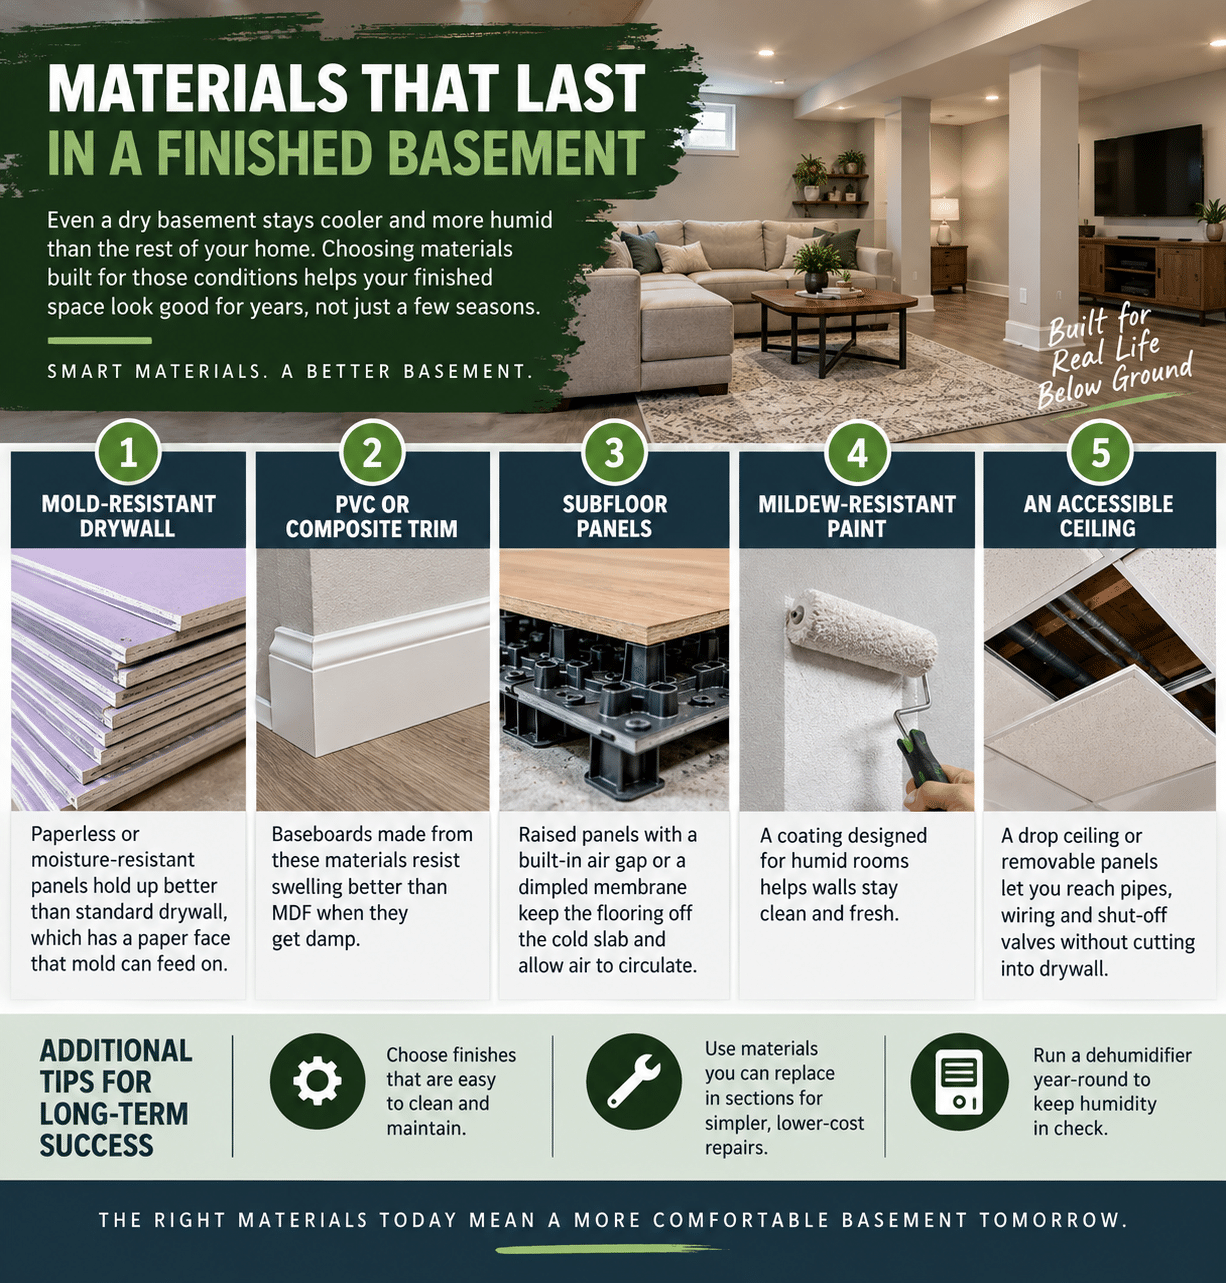
- Mold-resistant drywall: Paperless or moisture-resistant panels hold up better than standard drywall, which has a paper face that mold can feed on.
- PVC or composite trim: Baseboards made from these materials resist swelling better than MDF when they get damp.
- Subfloor panels: Raised panels with a built-in air gap or a dimpled membrane keep the flooring off the cold slab and allow air to circulate.
- Mildew-resistant paint: A coating designed for humid rooms helps walls stay clean and fresh.
- An accessible ceiling: A drop ceiling or removable panels let you reach pipes, wiring and shut-off valves without cutting into drywall.
Think about upkeep as you choose finishes, too. Surfaces that wipe clean and materials you can replace in sections make future repairs quicker and cheaper. Pair them with a dehumidifier that runs year-round, and your basement will stay comfortable long after the project wraps up.
Keep Your Basement Finishing Project on Track
A basement that stays dry, comfortable and mold-free starts with planning for what you can’t see yet. Solve moisture problems first, inspect the structure as soon as the old finishes come down and choose materials made for below-grade conditions. Build a contingency into your budget, and your project is far more likely to finish on time.
Keep the mess from slowing you down, too. Bargain Dumpster offers roll-off dumpsters in a range of sizes for basement cleanouts and renovation debris. An on-site container keeps your space clear from the first swing of the hammer to the final coat of paint.