
How to Renovate Your Deck Without Tearing It Down
A weathered deck doesn’t necessarily need to be demolished. In many cases, the structure underneath is still solid, even if the surface has seen better days. If the frame is in good condition, renovating your existing deck can save you a significant amount of money while giving your outdoor space a fresh, updated look. Summer is the perfect time to tackle the project. Plus, restoring your deck now means you can enjoy it for the rest of the season instead of looking at cracked boards and faded wood.
Start by Assessing the Deck’s Condition
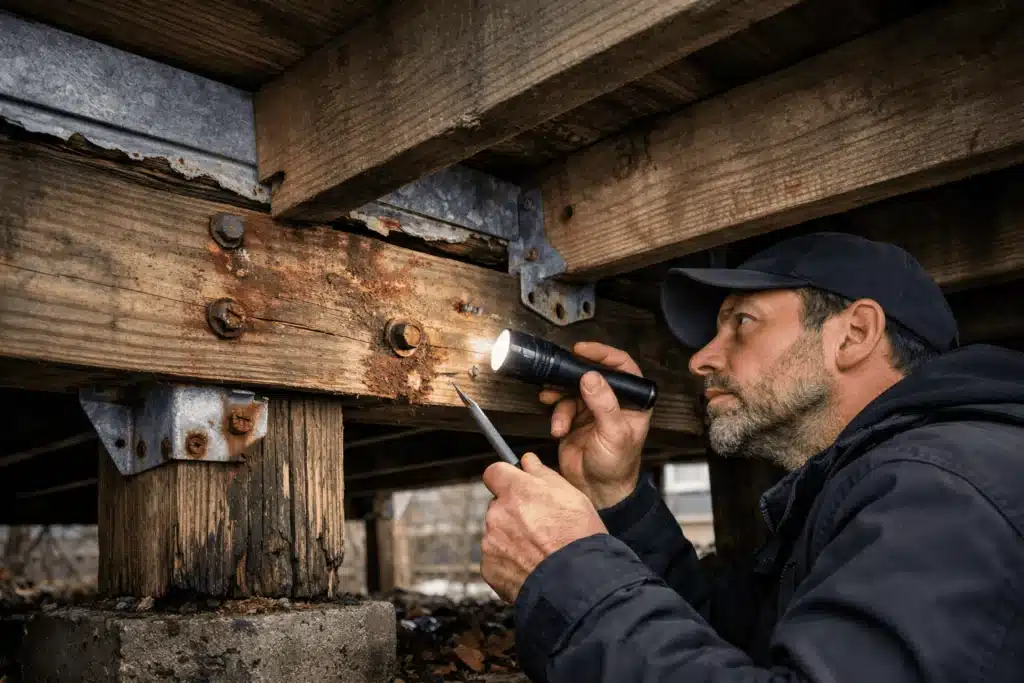
It costs approximately $8,246 to build a new deck, but the price will vary depending on size and materials. However, there’s no need to build a new deck from scratch if it’s still in decent condition. Before buying stain or replacing boards, inspect the entire deck carefully. A cosmetic makeover won’t solve structural problems, so this is the most important step.
Walk across every section and pay attention to movement. Does the deck feel sturdy, or are there soft spots and areas that bounce under your weight? Check the railings for stability, examine the stairs and look underneath the deck if possible.
Some issues are easy to spot, including:
- Loose or popped nails and screws
- Splitting or cracked boards
- Rotting wood
- Mold, mildew or algae growth
- Rusted metal fasteners
- Sagging joists or beams
If the support posts, beams or joists have widespread rot or severe damage, a full rebuild may be necessary. However, if the problems are mostly limited to the surface boards or hardware, renovation is often the smarter choice.
Understand the Wood You’re Working With
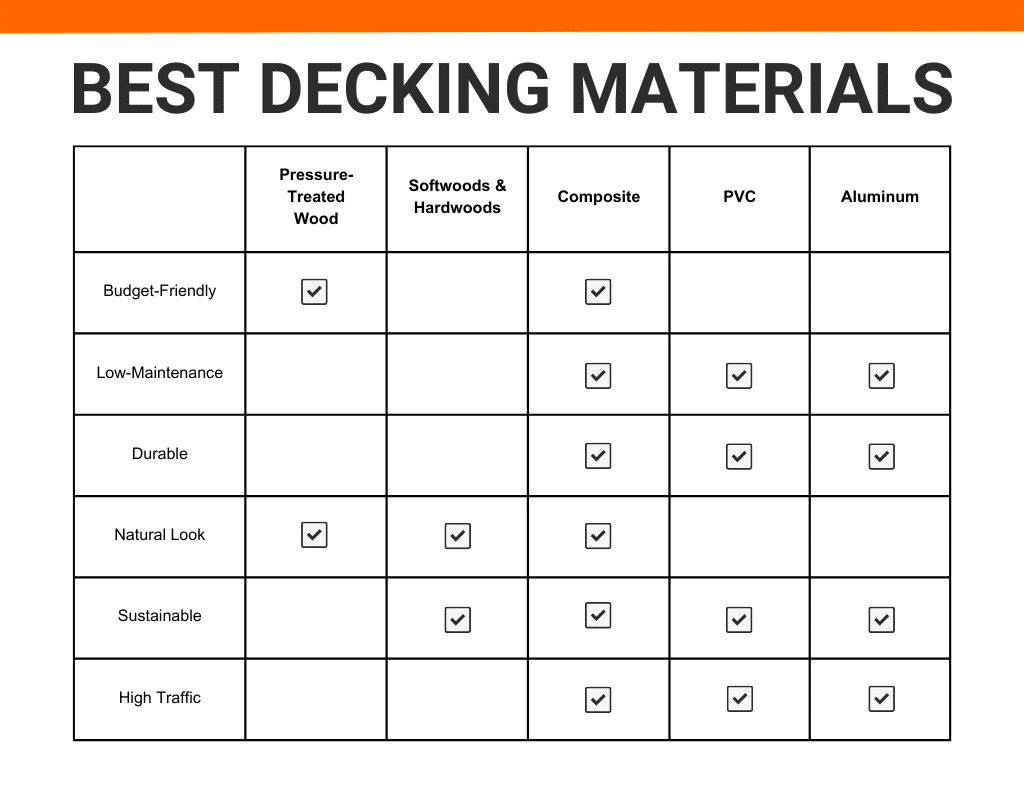
Decking materials age differently, and knowing what you have helps determine the best restoration approach. Softwoods such as pressure-treated pine, cedar and fir are among the most common decking materials. They’re affordable, relatively easy to repair and respond well to sanding, staining and sealing. When responsibly sourced, softwood is also a more sustainable option because it grows much faster than many hardwood species. Pressure-treated lumber can last for decades with proper maintenance.
Hardwoods like ipe, mahogany and teak are naturally more resistant to insects and moisture, usually requiring specialized oils instead of traditional stains. Meanwhile, a composite deck has its own maintenance requirements and generally shouldn’t be sanded like natural wood.
If you’re replacing damaged boards, try to match the existing wood species whenever possible. This helps maintain a consistent appearance and ensures the boards expand and contract at similar rates throughout the year.
Give the Deck a Thorough Cleaning
Years of dirt, pollen, mildew and old finishes can hide the deck’s true condition. Cleaning also prepares the surface for repairs and refinishing. Start by removing furniture, grills, planters and decorations. Sweep away leaves and debris, paying close attention to gaps between boards where moisture often collects.
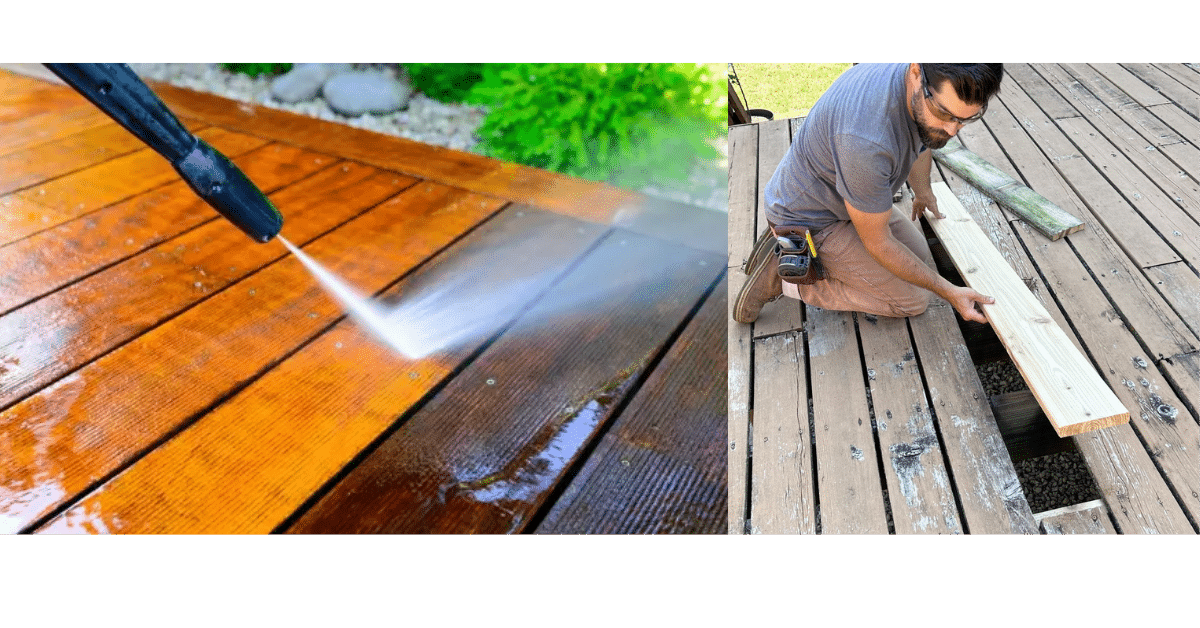
Next, wash the deck using a wood-safe deck cleaner. A stiff brush works well for smaller areas, while a pressure washer can speed up the job if used correctly. Keep the pressure low enough to avoid gouging the wood, especially if you’re working with species like cedar or pine.
Allow the deck to dry completely before moving on. Depending on the weather, this may take a day or two.
Replace Damaged Boards Instead of the Entire Deck
Not every board deserves saving. If individual boards have extensive rot, deep cracks or insect damage, replace them rather than trying to repair them. Fortunately, swapping out a handful of boards is much less expensive than rebuilding the entire deck.
As you remove damaged boards, inspect the joists beneath them. Moisture can sometimes become trapped between the framing and decking boards, creating hidden deterioration that isn’t visible from above.
Use corrosion-resistant screws when installing replacement boards. Deck screws generally provide a stronger, longer-lasting hold than nails and reduce the likelihood of future movement.
Reinforce the Structure Where Needed
Even if the deck feels mostly solid, small structural improvements can significantly extend its lifespan. Tighten loose bolts connecting the ledger board to your home. Replace rusted brackets or connectors, and add extra blocking between joists if certain areas feel flexible.
You should also examine the support posts. If they’re beginning to shift or settle, reinforcing them now can prevent larger problems later.
Many older decks were built to meet building standards that have since changed. While you don’t necessarily need to rebuild everything, upgrading important structural hardware during a renovation can improve safety and durability.
Replace Worn Hardware While Everything Is Accessible
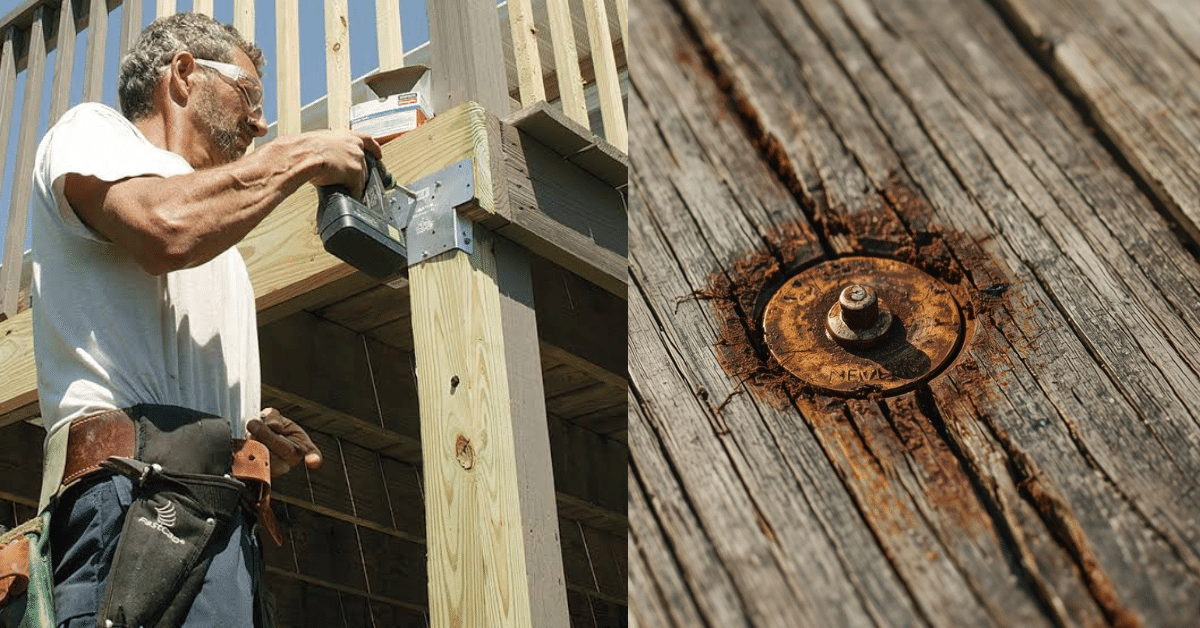
Deck boards aren’t the only components that wear out over time. Fasteners and metal hardware are constantly exposed to rain, humidity and temperature changes, making them susceptible to corrosion.
As you renovate, inspect every screw, bolt, joist hanger and bracket. Tighten anything that’s worked loose, and replace rusted hardware with galvanized or stainless steel alternatives designed for outdoor use. These materials resist corrosion far better than standard steel and keep the deck structurally secure.
Since much of the hardware is easiest to reach while boards are already being removed or repaired, addressing it during the renovation can prevent another maintenance project down the road.
Sand Away Years of Wear
Once repairs are complete, smooth the surface. Sanding removes splinters, levels uneven repairs and eliminates much of the remaining stain or weathered gray wood. It also helps new finishes penetrate more evenly.
Focus especially on high-traffic areas and where replacement boards meet older ones. An orbital sander works well for most homeowners, while detail sanders can reach corners and around railings. After sanding, vacuum or sweep thoroughly to prevent dust from interfering with the finish.
Protect the Wood with Stain, Paint or Sealer
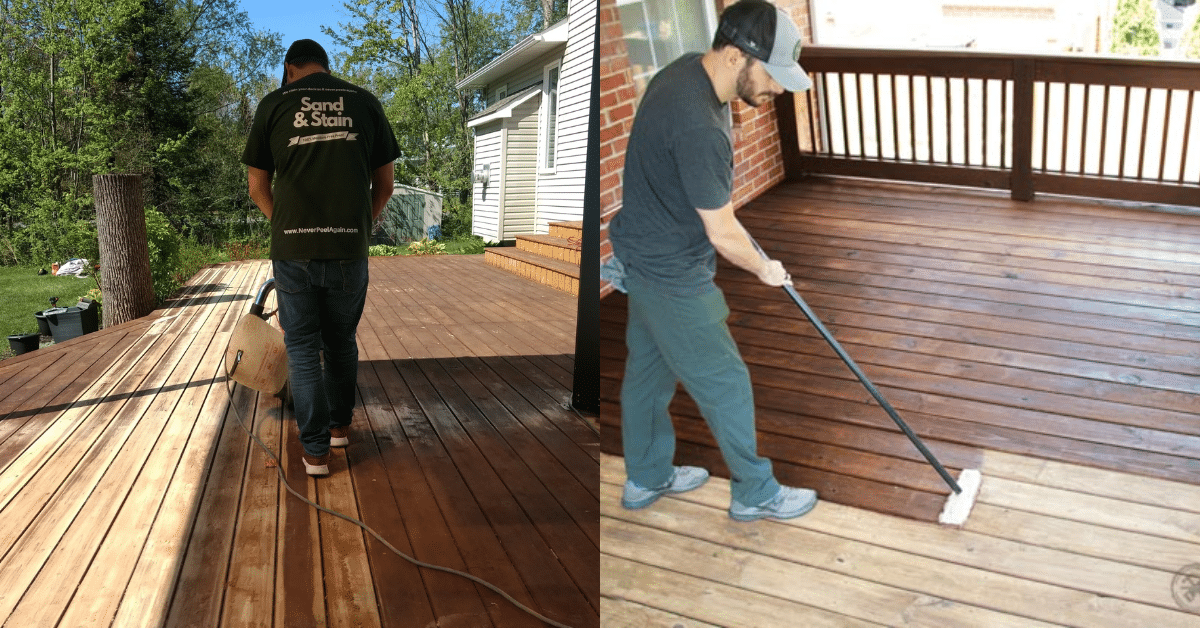
This is where the transformation really happens. If you want to highlight the wood’s natural grain, choose a high-quality deck stain. Transparent stains showcase the wood’s appearance, while semi-transparent and solid stains offer greater UV protection and hide imperfections more effectively.
Make sure to remove any dust or dirt from the boards before sealing your deck. Paint provides the widest range of color options and can completely refresh an older deck, though it may require more maintenance over time as it chips or peels.
No matter which finish you choose, apply a waterproof sealer if it’s not already built into the product. Moisture is one of the biggest causes of wood deterioration, and sealing the surface helps protect your investment. Always follow the manufacturer’s recommendations regarding temperature, drying time and the number of coats.
Upgrade the Details for a Bigger Impact
Small upgrades can dramatically improve appearance and functionality without requiring a complete redesign.
Consider adding:
- Modern metal or cable railings
- New post caps or decorative lighting
- Built-in benches or planter boxes
- Solar-powered step lights
- Updated stair treads
- Privacy screens or pergola accents
Even replacing outdated hardware with newer finishes can give an older deck a much more contemporary appearance.
Create a Maintenance Plan for the Future
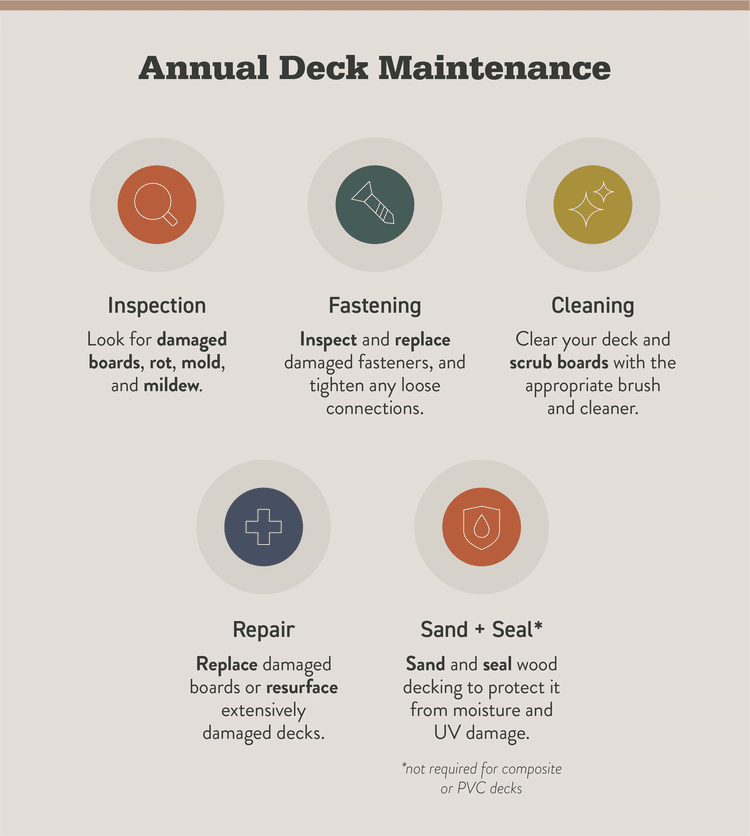
Once your deck looks like new again, a little routine maintenance will help keep it that way. Make a habit of sweeping away leaves and debris throughout the year so the mixture doesn’t become trapped against the wood. Wash the deck every spring to remove dirt, pollen and mildew before they have a chance to build up. It’s also a good idea to inspect the boards, railings and fasteners annually so you can catch small problems before they become expensive repairs.
Most wood decks also benefit from being resealed or restained every few years, although the exact timing depends on your climate, the amount of direct sunlight the deck receives and the type of finish you’ve used. After the first year, you’ll only need to reseal your deck every two or three years, unless it’s highly exposed. Staying ahead of routine maintenance will extend the life of your renovation and help your deck remain a safe, inviting place to relax season after season.
Finish With a Final Cleanup
Deck renovations often create more waste than people expect. Old boards, broken railings, nails, screws, packaging, sanding dust and construction debris can quickly pile up.
Before enjoying your refreshed outdoor space, thoroughly clean the area. Sweep away leftover dust, collect fasteners that could become safety hazards and separate recyclable materials whenever possible.
If your renovation involves replacing multiple boards or removing larger sections of the deck, renting a dumpster can make disposal much more efficient. Instead of making repeated trips to a landfill or filling curbside bins over several weeks, you can keep all demolition debris contained in one place while you work and have it hauled away once the project is complete. Services such as Bargain Dumpster can help homeowners find an appropriately sized container for their project, making cleanup one less thing to worry about during the renovation process.
Check That Your Deck Drains Properly
Water is one of the biggest threats to any wooden deck. Even if you’ve repaired damaged boards and reinforced the frame, standing water can shorten the life of your renovation.
As you inspect the deck, pay attention to how water drains after rain or washing. Leaves and debris can clog the gaps between boards, trapping moisture where it shouldn’t be. Cleaning these spaces improves airflow and allows the deck to dry more quickly.
It’s also worth checking the grading around your home. If water consistently pools beneath the deck, consider improving drainage with gravel, extending downspouts or adjusting landscaping to direct water away from the structure. Preventing excess moisture now can save you from more extensive repairs later.
A Fresh Look Without Starting Over
Replacing the entire deck is expensive, time-consuming and often unnecessary. If the underlying structure remains sound, careful repairs and thoughtful upgrades can restore its appearance and performance for years to come.