Having your own oven in the backyard is a dream that many of us have because your own backyard oven is not just accompanied by a fresh supply of good soft bread but also the ambiance that comes along with it, which makes all the hard work worth it!
In this article, we will be looking at two different kinds of Bread Ovens that you can build yourself.
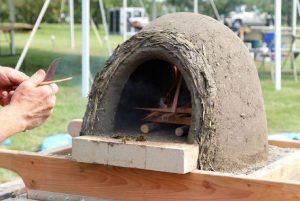
DIY Wood-Fired Earth Oven:
•Gather all your equipment, that is, your shovel, a wheelbarrow, scraps of lumber, tape measure, a plastic tarp, and some kitchen utensils that will be used for sculpting.
• You’re going to start by preparing the base of your oven. If you’re planning on using your oven frequently, you should build the oven floors at waist height for convenience. To make your base, you can use anything, for example, rocks, broken-up concrete, logs, old metal barrels, and sawhorses.
•Now, coming to your wood-fired oven floor. Ideally, this should be about 27 inches. You’re going to start working on the floor by setting up red or fire bricks on the smooth sand. Make sure that your bricks are free of old mortar. Set your first layer leveled and solid making sure that it is flat and firm. If you see a brick stand up from somewhere, tap it down to be on the same level as the rest.
•Now you’re going to have to make a form. Start by shaping moist sand on the floor bricks. Your form must be first covered with mud and then removed to make up the oven’s interior. The form should ideally be a bit more than at least half of the oven’s floor width, so keep a firm check on calculations and measurement while working on building your oven.
•Cover your sand form with the help of wet newspaper sheets so that the mud walls do not stick to the sand form. Now cover it with a 3 inches thick layer of mud. Make sure you press the mud against itself, and when you are done, allow the material to sit solidly against the form.
•Once your first layer has dried, add on more layers on top of it, and if you wish to give it a smooth finishing, plaster it.
•When the mud walls dry up, remove the sand form. Remember to be patient and allow it to dry properly, even if it means waiting for a couple of weeks.
•The last step would be to carve out the door and dig out the rest of your sand form. Using kitchen utensils like a spoon, rub in the material until you get the look you desire.
DIY Brick Bread Oven:

•Layout a smooth foundation for your oven and ensure that you are well-equipped because brick ovens are generally very heavy. Now you’ll want to start by pouring yourself a full concrete footer first and then start working on building a concrete block stand that will give the oven sufficient height to provide for a comfortable baking experience. This will also allow you to store the wood needed for the oven conveniently.
•Begin with the construction of the foundation layer of your oven, which should preferably be made of insulating concrete that is a mixture of vermiculite and portland cement.
•Next, you’re going to have to lay out three layers of fireclay mortar that consists of 1 part of portland cement, 3 parts of sand, 1 part of lime, and 1 part of fireclay; however, you do not necessarily need to make this yourself because it is available in stores.
•Then go ahead and add a layer of firebrick that would form the floor of your oven. Once that is cured, remove the floor from and build up your fire brick walls and the oven roof using fireclay mortar and other plywood arch forms that are available and match your choice.
•Once all of the essentials are out of the way, start working on your insulation layers. Having a well-constructed insulation system is incredibly important to retain heat inside the oven and maintain constant high temperatures for baking. So to make sure that none of the heat that is produced by the fire brick and fireclay mortar escapes the oven, you need to have decent insulation.
•If you want to go an extra mile to ensure proper insulation, you can purchase a roll of ceramic fiber blanket, wrap your oven with it and add 3″ –4″ of the vermiculite and Portland cement mixture.
And that’s it!
To get an even better understanding of the visuals, we recommend watching youtube videos that will guide you through the process.
You must be wondering now, but what exactly is the point of making so much effort to build yourself an oven and then bake your bread in it when you can easily buy both your bread and, of course, an oven. To answer this question, we have enlisted below a list of benefits that come along with building your own DIY Bread Oven.
Benefits:
1) Baking in the typically made wood-formed oven improves the flavor and quality of your bread. It’s just not the same as store-bought ones, and you will get to know what we mean by this only when you try it yourself!
2) Because DIY bread ovens emphasize so much on proper insulation, by baking in these events you will be significantly reducing your fuel consumption. A properly insulated oven can retain its internal heat for days.
3) It’s cheaper and will save you money in the long run.
Waste Management:
The last thing that we need to discuss here is waste management and how to best recycle and reduce your waste. Of course, it’s only natural that building an oven yourself like any other everyday activity will create waste. But you do not need to worry about that too much because we have the perfect solution for you.
We at Myrtle Beach Bargain Dumpster can provide you rental dumpster services at competitive pricing. This can also be useful if your are changing your patio door. All you need to do is give us a call and schedule a delivery for yourself based on the size of container that you require, and we will have all your waste management sorted!