Arts and crafts are calming and are also a fun activity for the entire family. Even something as simple as coloring will aid growth because arts and crafts encourage children to use their creativity when working toward a target. Crafting engages children’s imaginations and allows them to express themselves creatively in their own unique ways.
Cutting, coloring, and drawing activities teach the children to be hands-on, which is a valuable skill in writing, typing, and even tying shoelaces. A sense of pride and achievement that comes with completing a good craft project often boosts their self-esteem. Working on arts and crafts projects as a family is a beautiful way to connect and spend quality time with the kids.
There are some must-have craft materials, whether you’re an accomplished crafter or a beginner.
⦁ a piece of paper
⦁ punch a hole
⦁ tape for masking
⦁ a painting brush
⦁ a pair of scissors
⦁ knife for crafts
⦁ glue gun, as well as glue sticks
⦁ materials for writing (Markers, Pens, Crayons and Colored Pencils)
⦁ glitter
⦁ a can of paint
⦁ brushes for painting
⦁ organizers for Crafting
To get your family started, here are some simple DIY craft ideas for kids:
Butterfly Made Of Paper
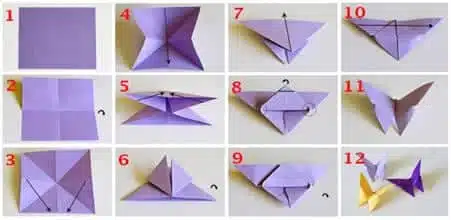
The paper butterflies are a great Spring and Summer decoration for kids to create. They can be used to brighten up dark corners in the kids’ room or as a last-minute birthday party decoration.
To begin, gather various colors of paper and follow the instructions below:
⦁ Please fold the paper in half to make a mountain fold, then open it out and fold it half the other way.
⦁ Fold along both diagonals to create two more mountain folds.
⦁ Make a triangle by folding the middle folds in and collapsing them.
⦁ Bring the top layers of both corners together in the center.
⦁ Turn it over and pull up the bottom corner. Fold it past the top edge so that the triangle’s tip reaches over the edge. Flatten the crease’s middle but not the edges.
⦁ Fold the triangle’s tip over and crease it. If you’re using something thicker than origami paper, you may need to use some glue to keep this flap in place.
⦁ To complete the butterfly, fold it in half to help form it. Now all you have to do is find a spot to put your origami butterfly on display and enjoy it.
How To Build A Train From Toilet Paper Rolls
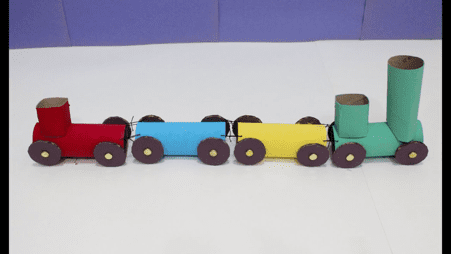
⦁ Color your cardboard tubes with a variety of vibrant colors. To make the top of the engine and the caboose, cut C-shapes out of one of the tubing.
⦁ Once the engine and carriage tops are dry, hot glue them in place. As the train’s wheels, hot glue four plastic lids to each cardboard tube.
⦁ Punch small holes in the four “corners” of each tube to serve as attachment points for the yarn used to connect the pipes.
⦁ To connect two tubes, weave the thread through one and the other tube. Repeat the process until all of the train’s cars are linked.
⦁ You’ve just received a new toy!
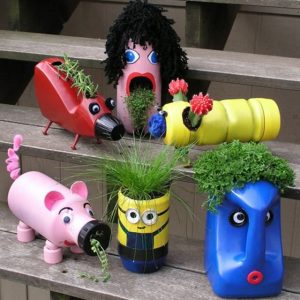
Plastic Bottle Flowers
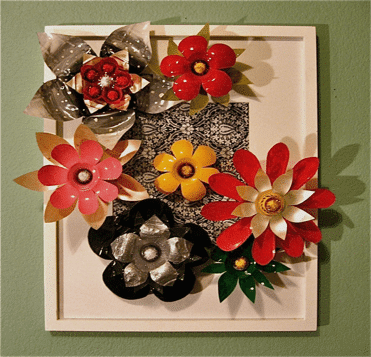
⦁ Cut the water bottles’ ends off and let them dry.
⦁ Allow drying after painting the interior of the bottle ends.
⦁ Trim the bottle into leaf shapes by cutting it into large stripes.
⦁ Trim your stipes to the length you want them to be and glue them to the back of the bottle end.
⦁ Turn the bottle end around and glue yellow balls to the bottle bottom indention (middle) and the leaves to the straws.
⦁ You can make a wall hanging by gluing your lovely petals on a solid board.
House With Toilet Paper Rolls
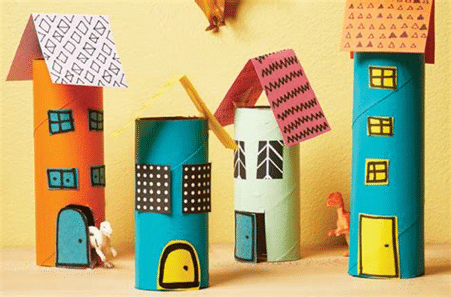
Make a mini town with your children out of those empty paper rolls.
⦁ Use a range of colors to paint ⦁ toilet paper and paper towel rolls.
⦁ Fold the construction paper in half to make a rectangle. Make a zigzag or mini triangle pattern on your roof.
⦁ On construction paper, draw a door, cut it out, and glue it to the roll. Cut the roll to allow the door to open. For the walls, use patterned paper.
⦁ Attach the roof with tape on the inside of the roll (sticky side out).
Binoculars From Toilet Paper Rolls
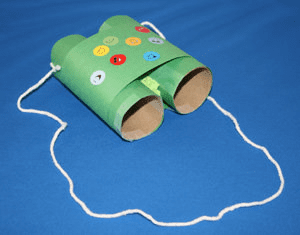
⦁ Join two toilet paper rolls together.
⦁ To join them, use three different types of glue.
⦁ Before moving on to the next stage, let the glue dry.
⦁ Wrap the rolls in the same paper that you’ll be using to protect your binoculars.
⦁ Wrap the paper across the binoculars’ diameter and cut off the excess with scissors.
⦁ To secure it around the rolls, use glue dots.
⦁ Use crayons or markers to decorate your new binoculars however you like.
⦁ You can also use tissue paper to make a collage.
⦁ Drill holes in the sides and attach a harness to two of the ends.
⦁ Go on an adventure in your own home or backyard!
Craft Of The Bottle And Container
Nothing beats a low-cost crafting project or a handcrafted gift. Instead of throwing away a clean wine bottle, coat it in craft glue and cover it in colorful yarn.
There’s something unique about gifts created by children, particularly if they’re helpful.
Containers are ideal gifts because they can accommodate a wide range of products, including art supplies and kitchen utensils, as well as bike tools and cut flowers.
Besides recycling empty bottles, you can recycle other empty containers in the house to make valuable objects. You can make some of the product from recycled containers: such as a pencil holder, jewelry containers, a Knitting Caddy or Tool Canister, and a Fancy Vase.
Kids’ Edible Crafts
Crafting with food is another way to keep kids occupied at home. Food crafting is ideal because kids enjoy hanging out in the kitchen and “helping,” as well as crafting. So combining the two to keep little ones occupied when reaping the benefits of their labor is a brilliant idea. This kitchen craft will also help children learn the fundamentals of cooking and baking and amuse and entertain them.
Edible Gardens Are A Form Of Edible Craft.
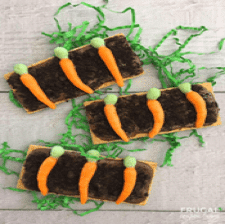
You and your kids should make some garden beds together using graham crackers as the foundation and chocolate as the “glue.”
They’re filled with chocolate pudding and smashed chocolate cookies, then topped with candy and food gel to make a miniature carrot garden that they can eat!
Flower Garden Cupcake
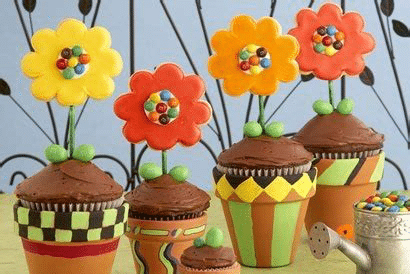
Mini muffin tins can be used to make cute little cake cups. Bake the cake with the kids first, then decorate with chocolate and crushed cookies. Then, uniquely, non-edible flowers from your favorite craft store were included. These will enable children to be more hands-on and imaginative. They’ll have to pay close attention to detail when filling each “box” and planting the flowers.
This particular method of crafting with children contributes significantly to the development of your child’s personality. Above all, these practices will aid in strengthening your relationship with your child and reuniting the family.
Please choose one of the above DIY crafts to involve your kids and spend quality time with them. You’ll be astounded at how much value crafting together can bring to their development and your family’s overall. For a detailed guide to healthy living, check out our other posts at THE TIPSTER and follow us on social media:
INSTAGRAM FACEBOOK TWITTER PINTEREST